Saturday, August 3, 2013

Mulch Ado About Nothing


Mulch. Ugh. The word is guttural and makes you sneer when you say it. "Mulch" {sneer}

I got it in my head one day that I hated mulch and comfortably waved an anti-mulch banner for years. It makes it hard to rake leaves and gives you splinters. When you want to plant something you have to move the mess out of the way. It is not comfortable to walk atop with bare feet, and I almost always have bare feet. These were my reasons for hating it so.

But...

I was staring the pictures from the last post, thinking that something just didn't seem right. The garden seemed haphazard and lacked a certain luster even though there were blooms. It must be the weeds, I thought, so the next day, I cleared out anything I hadn't planted. Though it was a marked improvement (and surprisingly relaxing), it still needed something.

My coworkers at the nursery are always preaching the finer attributes of mulch, mainly that it helps your plants retain water, keeps roots protected, and deters weeds from popping up. With the weeds freshly cleared, a little voice that sounded a lot like them creeped in and said, "Now's the time to mulch. Dooooo iiiiittt."

So I did. Sixteen bags of shredded bark and one splinter later, the garden is glowing. Everything looks so good. It looks finished, and the colors are popping against the rich brown color of the mulch. Oh my goodness, it happened. I, Shannon, am a reformed anti-mulchest.


Wednesday, July 31, 2013

In the Back Corner

What was once home to gnarly trees, surrounded by a nest of lily of the valley, is now a corner bed filled with plants that grow bigger every day.

Wild and weedy in early spring
Mowed down and freshly planted in early summer
Today's view!
The cool spring temperatures and regular rain (hear the storm coming through now?) have certainly helped my success as a gardener-in-training. I haven't killed much of anything yet, and every time I go out for a round of the yard and see something flower, I burst in to a full scale musical number complete with singing cartoon birds and dancing squirrels. I mean, really, why doesn't everyone garden?

Name that plant! The new corner bed includes Glow Girl spirea, Abracadabra Star hydrangea, Black Lace elderberry, three Incrediball hydrangeas, Chardonnay Pearls deutzia, All That Glows viburnum, Let's Dance Diva! hydrangea, and Vanilla Spice summersweet. Oh, and a mystery perennial with an already lost tag.

Monday, July 1, 2013

Reclaimed Brick Patio


And fire pit! I bet you weren't expecting that. 

My not-so-abridged version of how it came to be: The City of Grand Haven fire regulations state that a fire pit must be 25 feet from major structures. Between the house and the shed, that put it in a very awkward spot under a large and low hanging plum cherry tree. Mike and I hung our heads and came to terms with the idea of a s'more-less summer. 

While working on the patio, we continually bumped our heads (backs, bodies...) against said tree, and in a moment of frustration, we broke out the chainsaw and said, "Be gone!" Suddenly, the yard opened, the angels sang, and the 25-foot fire range fell perfectly at the end of our patio. 

Side Note: When chopping down trees, have a disposal plan. We filled over twenty yard waste bags with the clippings from three trees. I went back to the hardware store three times, and it filled the entire front curb on trash day. Whew!
The day Mike fell in love with chainsaws.
You may notice our splotchy grass around the edge of the patio, too. We're filling in the over-tilled yard by seed, and what you see is two weeks' progress. For a moment we thought about sod, drawn in by its "quick-fix-home-makeover-show" lure, but it would have been over $300 for the small space around the patio and perimeter of the yard. No thanks. Instead we'll take the $20 bag of seed, $11 bag of papery "grass mulch", and a lot of patience. 


Thursday, June 13, 2013

How To: Reclaimed Brick Patio

Digging around the yard unearthed a random paver or two - or hundred, all mix-matched and beautiful. As Mike and I stacked, we decided not to waste a single one. It was time to get creative, put the bricks to work, and learn to lay a patio.

Materials Needed:
  • Paver stones (reclaimed or new to suit your fancy)
  • Crushed Gravel*
  • Sand*
  • Paver Sand
  • Landscape Fabric
 * To determine the amount of gravel and sand needed, it takes some math. Multiply the length x width x height of your layer, all in feet. For a 10' x 10' patio and a 3" thick layer, multiply 10 x 10 x .25 (3" is a quarter of a foot) for a total of 25 cubic feet. 

Tools:
  • Tiller
  • Tape Measure
  • Brightly-colored string
  • Wooden stakes
  • Level
  • Stamper
  • Shovels
  • Wheelbarrow
  • Rubber Mallet
  • Hose with "Mist" setting
  • Medium-bristled Push Broom
Project Time: 3 Days

Project Cost: Around $200 for gravel, sand, and paver sand


Step One: Determine Your Pattern
We laid the pavers this way and that before deciding on a striped pattern with an irregular, "coastal" edge. What can I say, we're Michiganders. People in Michigan love their coast. Fact.


Step Two: Till the Space
After carefully stacking the pavers off to the side, Mike rented a tiller and went to town. Later that day, he attributed his best golf score ever to his arms being stretched out from loosening the dirt. Lesson learned: till before you swing.


Step Three: Determine Your Depth and Get Digging!
Proper patios are all about beautifully leveled layers, like a cake. The base is dirt, followed by 3" gravel, 2" sand, and 2" pavers. Unfortunately, this means digging out 7" of space. 


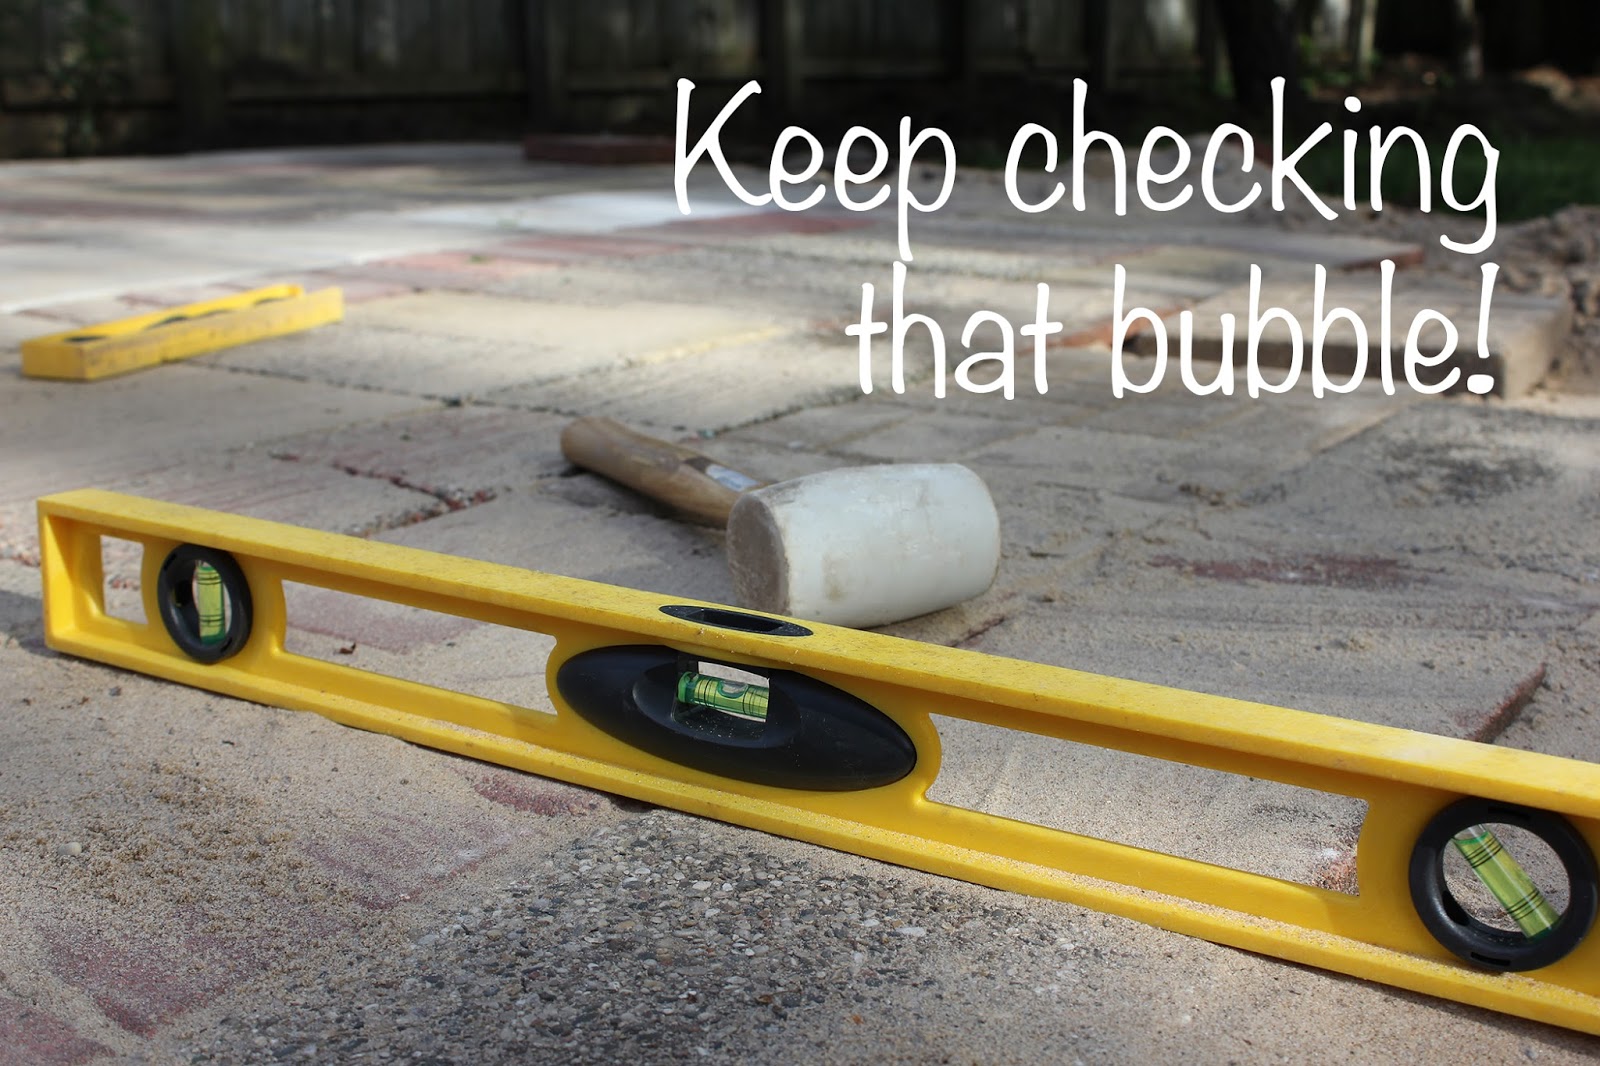
Step Four: Keep It Level
I measured out and marked the depths on wooden stakes and anchored them at various points along the edge of our area. Brightly colored string was tied between them and checked with a level to make sure we were on the right track. Tip: don't criss-cross them too much or go string-crazy since you do have to dig around them. 

Action shot of Mike and his mom, Sue. Nice hustle.


Fair-skinned beauties need giant red sun hats while working. They also need to keep things level. Getting the dirt just right definitely took the longest of all the steps, but a level base makes getting a level patio much easier. Using the string as my guide, I dragged a long, straight board (seen behind me in the photo) along the surface to even it out.


Step Five: Pack It Down
A stamper (real name?) is needed to make sure the base is solid. A layer of landscaping fabric was added to block out weeds.

Gravel delivery! Crushed gravel will compact to form a solid base.


Step Six, Seven, & Eight: Layer, Layer, Layer
We layered the gravel. Level. Stamp. Level. We layered the sand. Level. Then came the fun part: pavers!

The layer of sand gives the wiggle needed to keep the pavers level. This was imperative since our reclaimed bricks were different heights. A rubber mallet gently taps it in to place, and an extra long level keep things in check across multiple pavers. 


Step Nine: Paver Sand
Meet Rufus, protector of the paver sand and supervisor of the final step. Paver sand is a special mix that will set the bricks in place. It won't shift like regular sand. 


The paver sand was sprinkled into the space between pavers and swept into place using a stiff push broom until the surface was clean. Any sand left on the surface will stain and stick to the pavers. 


Set the hose onto mist and wet the surface every ten minutes for forty minutes. Look at those colors come out!

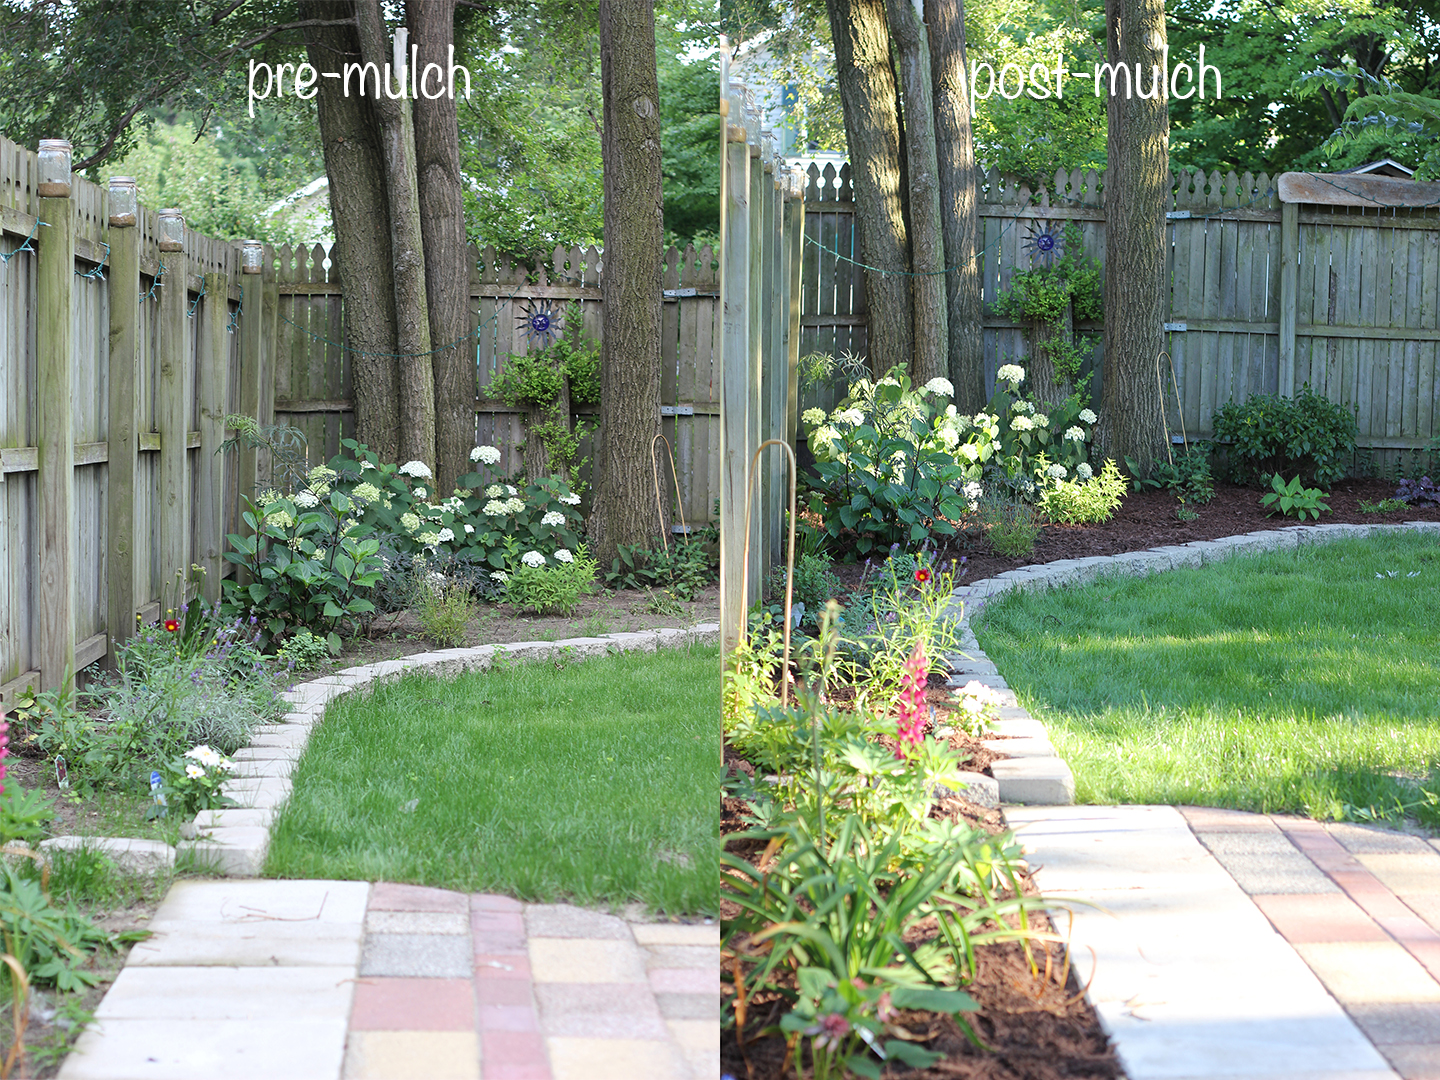
After the paver sand dried, our reclaimed brick patio was done; we love how it used the materials we found around the yard, giving us a truly unique patio. Check back soon for the big reveal.

Monday, May 20, 2013

This Is Progress

We tend to do things on a whim, to go outside for a brisk moment, and the next thing you know, it's on. We're in full-blown project mode. This is how our first garden bed came into being, a seemingly random stretch between two trees and next to the driveway. Why there? Simply whim.

When my parents travel cross state to visit, I resemble a first-grader at Show and Tell, talking with enthusiasm and waving my hands about to punctuate each sentence. This fated day was no different, and each turn had a story as we migrated through the house to the yard and around to what was once a gate. "It surrendered against Old Man Winter," I said as Mike leaned against the remaining six-foot section of fence.

Bam! Whim!

A moment later, I'm on my hands and knees, tearing out a tangled root system alongside my dad while Mike was tearing down and digging out what remained of the gate. Mom was humming to herself as she reorganized the shed.


 It was a mess of insidious ivy, emerging spring bulbs, and overgrown roses.


...And items of unknown origin, including a hardware store's worth of nuts and bolts as well as random pavers that we've been collecting from all over the yard.


Clearing the ivy's vast system of roots was the biggest challenge. We filled six yard waste bags while philosophizing on the roots, i.e. history, of the hundred year old house and garden that must have been much adored at some point. (I love having these chats, Dad!)


 In this battle, victory was ours to be had, as well as the opportunity to practice my hatcheting skills.


Then we were faced with a blank canvas, but as luck will have it, I have been hoarding a number of shrubs since we moved in, two of which are peeking out from the corner.


I made a quick sketch on graph paper to get an idea of how the plants would fit in the space once they were fully grown. I tried to get a balance of foliage colors from light (Ghost weigela and Chardonnay Pearls deutzia) to dark (Spilled Wine weigela and Black Lace elderberry). There is also interest for three seasons, with spring and summer flowers as well as strong fall color from Quick Fire hydrangea.


After I chose the plants on paper, I laid out the pots in the space, ultimately deciding that Vanilla Spice summersweet would have to go in a different spot. Sorry, friend.


What began as a whim will hopefully become 19 feet of gardening gold. There's still work to do in this area, such as giving that poor clematis something to climb on, but it feels so good to finally plant something. This is progress.

Monday, May 6, 2013

Spring Bulbs

Bulbs are amazing. I'm declaring them so. As dozens of surprise packages are sprouting across the yard, I stand with my arms raised in victory, gleefully laughing and saying, "Look! No hands!"

Bulbs are my first victory as a gardener, even if somebody else planted them long ago and my only part in their success was raking leaves away. Maybe some of these plants are really perennials. Perennial bulbs? Are there annual bulbs? Oh, I'm making things up, but either way, I'm thankful for them and making note to plant more in the fall.

(Gardening Truth: Bulbs are perennials and will come back each year unless your conditions kill them off - remember zones? If that is the case, you use them as you would annuals. Also, some summer-flowering bulbs are planted in spring. This information comes courtesy of the ever knowledgable and patient Stacey, co-worker and plant genius. Thanks!)

First came these little gems, identified as Siberian Squill.
Then came the daffodils.
Kicking it now are violets, which are perennials and not bulbs (our little secret).

Coming up next are the Lily of the Valley, favorites of mine since I was a wee one.

Tuesday, March 26, 2013

The Master Plan

Our backyard - an unsightly before.
The precursors to a legitimate spring season are arriving, mainly chirping birds, occasional bursts of sunshine, and the brown edges of the lawn emerging from a weird shade of snow, and as the snow recedes, our project grows larger. It’s time to bust a gardening move, which is to say we should start planning. Mike, the second, more-practical half of The 1326 Project, suggested making a project wish list so we can prioritize, plan, budget, etc.


To Do Wish List
"They"say we should...
  • Test Soil
  • Map Light Exposure
Front Yard
  • Remove Ugly Bushes
  • Replace with  Non-Ugly Plants
  • Paint Front Door
  • Rebuild Porch (oy!)
  • Walkway
Backyard
  • Remove Random Middle-Fence
  • Paint Burnt-Orange Deck
  • Build On-Deck Seating
  • Build On-Deck Privacy
  • Build Vegetable Boxes
  • Start Vegetable Seeds
  • Remove Precarious Trees
  • Fire Pit
  • Plants!
  • Turn shed into a wonderful carriage house/hang-out/guest quarters/super space (Mike, reading over my shoulder, just let out an "Oooo!" and said, "Put a star on that one." This is his dream.)
Side Yards & Driveway
  • Cut Flower Garden
  • New Gate
  • Widen Driveway
  • Window boxes
No big, right?